
Products
Solutions
Resources
9977 N 90th Street, Suite 250 Scottsdale, AZ 85258 | 1-800-637-7496
© 2024 InEight, Inc. All Rights Reserved | Privacy Statement | Terms of Service | Cookie Policy | Do not sell/share my information

After selecting the desired form from the Module landing page, it is now time to fill out the form and submit it. A task might also need to be completed.
There are many types of question formats which can include different types of fields: free text fields, calendar fields, time drop-downs, and more. Short free text fields have a 250 character limit. Long free text fields have a 4000 character limit.
Form and task types can vary depending on the module type, and what is required to complete prior to submitting. The below overview is only an example of what a typical form might require.
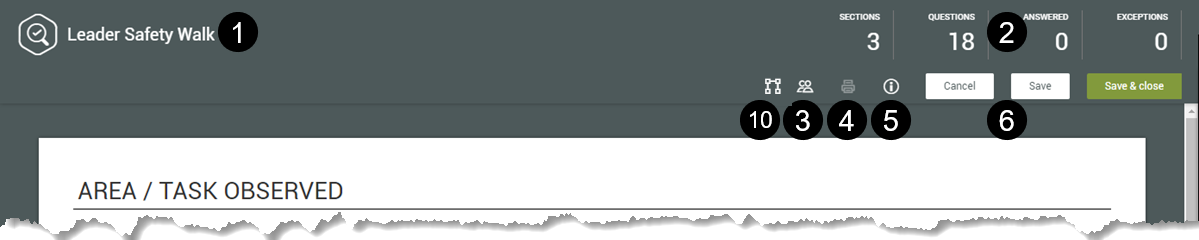
| Title |
Description |
|
|---|---|---|
|
1 |
Form name |
Name of the template. |
| 2 | Quick info | The number of sections, questions, questions answered, and answers considered exceptions. If you click the number of sections or exceptions, a table of contents opens for easy navigation. |
| 3 | User groups | Select what user groups have access to this form or task. This button is available only at the project level. |
| 4 | Print a PDF of the form or task. | |
|
5 |
Information |
The number of questions that have been answered. It also shows you several details pertaining to the form or task. |
|
6 |
Cancel and Save |
Cancels the form or task. Any changes made since the last time you saved are lost. Saves the form or task in its current state, and you can continue to fill it out if necessary. You can also save and close to exit the form. For tasks, you can choose to save and start a new task. |
|
7 |
Question types |
Various ways of asking questions within a form or task. Examples include:
|
|
8 |
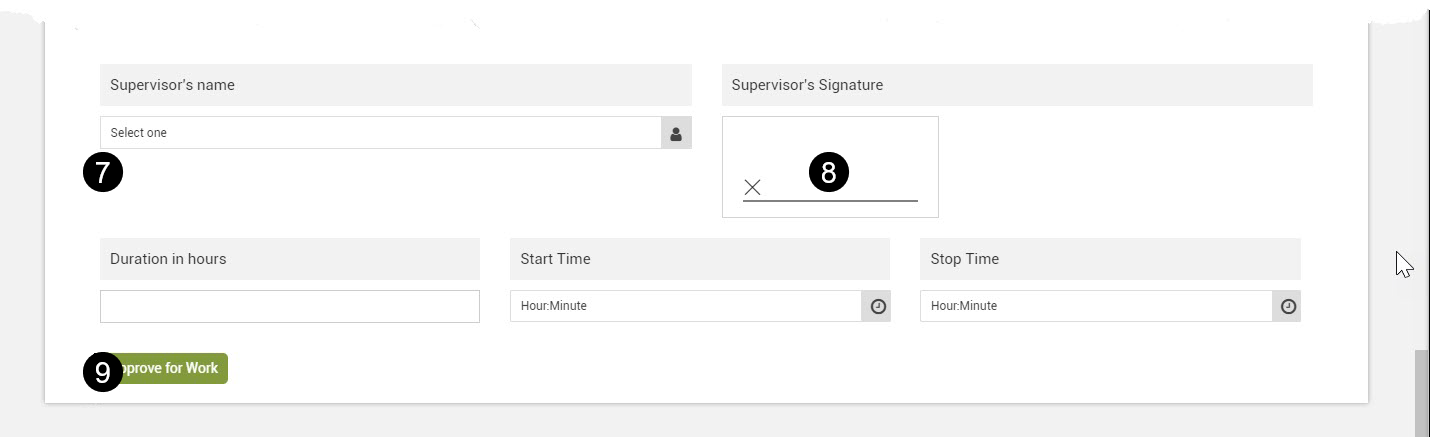
Signature block |
Some forms or tasks might require a user to sign off prior to submitting it. |
|
9 |
Button |
The outcome of clicking on a form or task button vary depending on the button’s configuration. The name of the button is defined by the administrator who created it (for example, Submit the form). |
| 10 | View active form flow | Lets you view which step and status in the form flow you are in. This only shows active after a form flow has started. If a form flow has not been started, the option is disabled. |
Form example:
Task example:
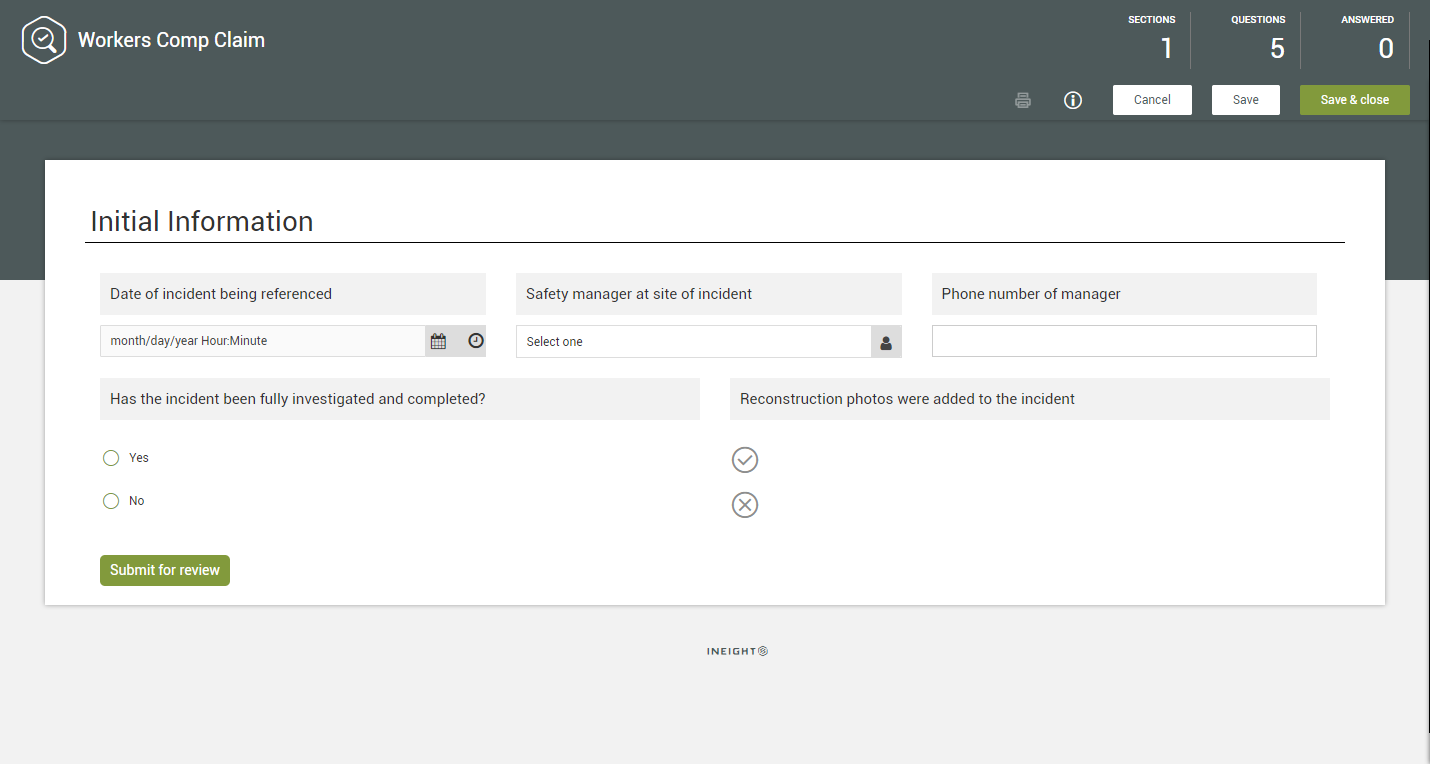
Most forms contain basic identifying information such as date, time, and location of the event, or free text fields asking for details about the event. The header information is higher-level material needed to complete a form. Not all forms have header information, however, as this is determined by the person creating the template of the form. Filling out the required information accurately is important for workflow and reporting reasons.
Tasks might also have header information as, at minimum, the Description, Responsible party and Due date are programmed fields.

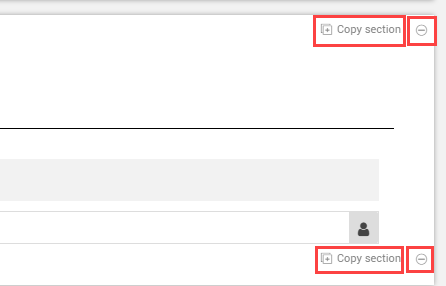
Depending on how the form or task template is set up, you might be able to copy a section. If the copy option is enabled, use the Copy section button in the section header to copy the section below the current section.
The Copy section button might have a different name, depending on how the form or task template was set up.
On the web, the Copy section button is shown in both the upper-right and lower-right of the header.
You can also click the Remove icon to remove a copied section.
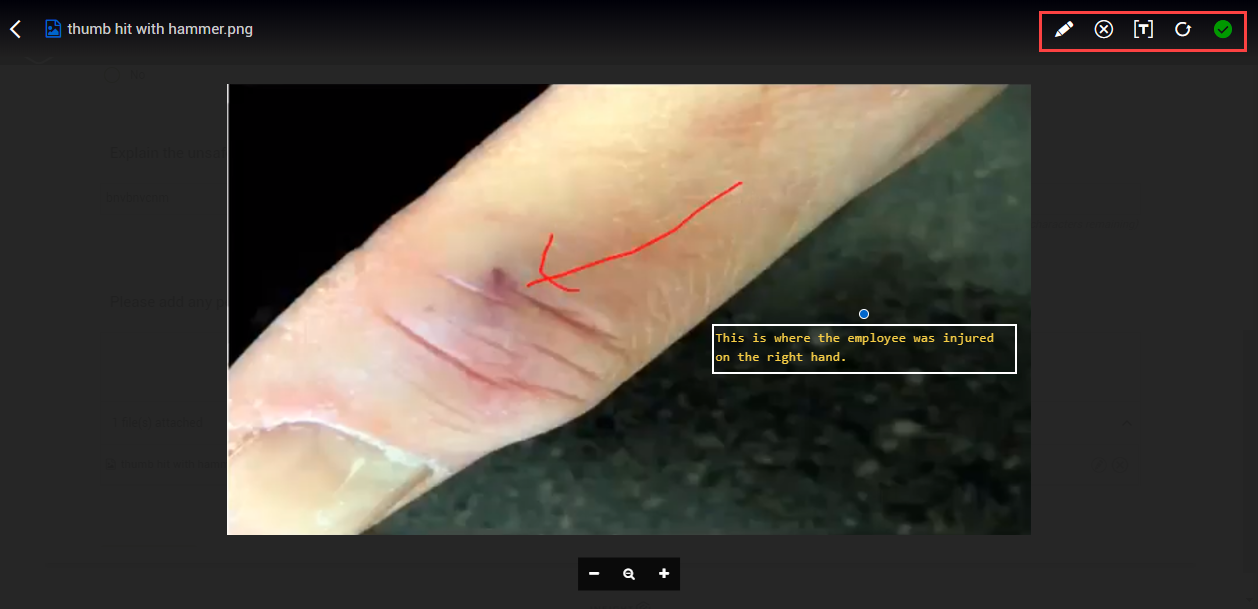
Some forms or tasks might include an option to include attachments such as photos. You can also include any annotations to describe the attachment in greater detail. Annotations help clarify what the photo represents.

For example, you can include an attachment photo for an incident showing an injured thumb. After you click Save, it is saved in the form or task. You can also annotate the photo by drawing a red arrow to the specific injured mark on the thumb or adding descriptive text.
On mobile devices, a time stamp updates when edits are made.
If integration with InEight Document is set up, you can attach supporting documents from the Document application. Click Select files or drag and drop, and then click InEight Document in the dialog box.
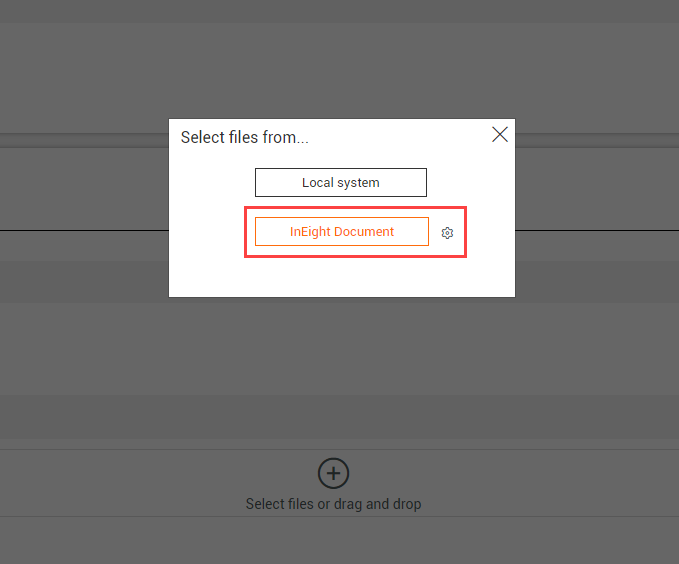
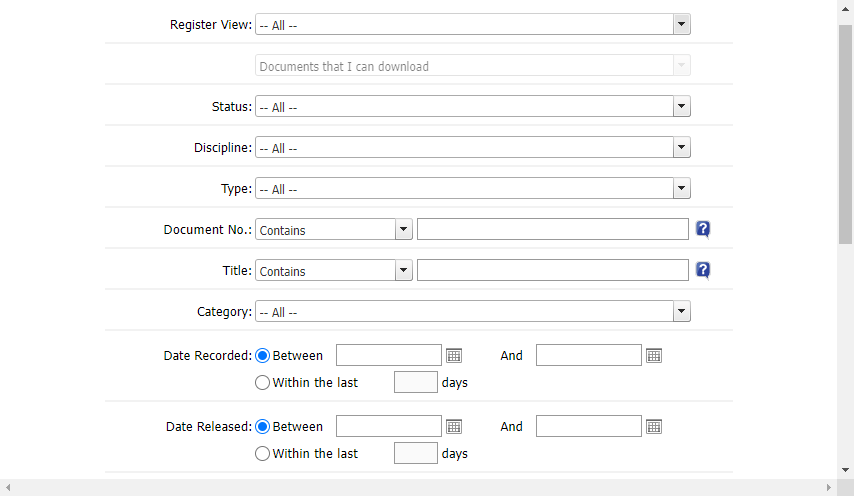
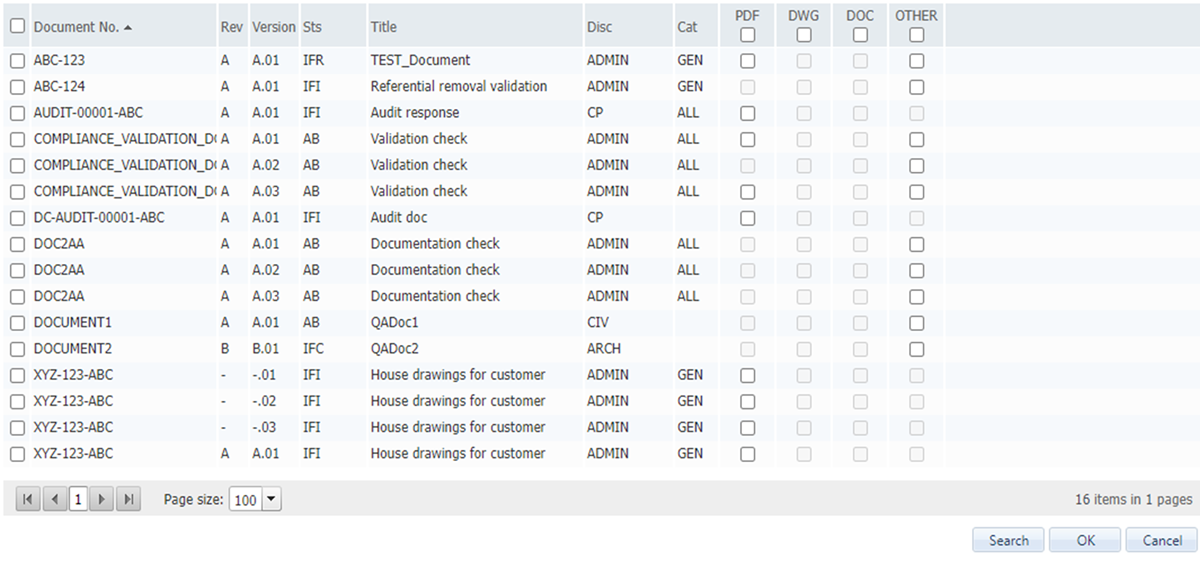
A new window opens where you can sign into Document, and then enter search criteria. Click Search. Results are shown according to your Document user permissions. Select one or more documents, and then click OK.
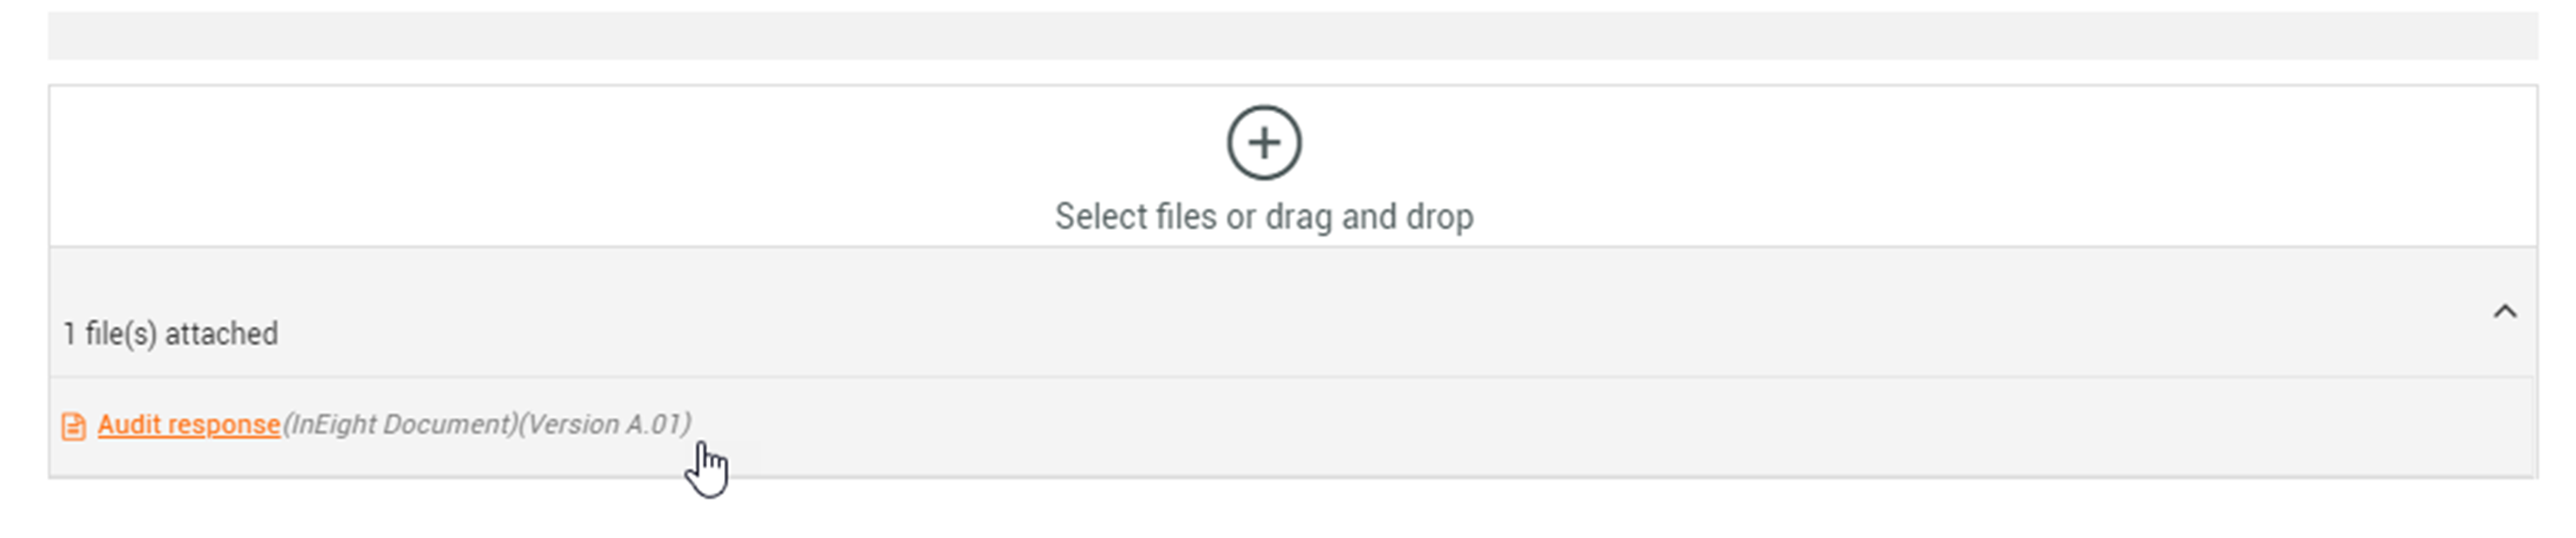
Document links are shown in the list of attachments in orange with the document version numbers. If you click a Document attachment, a new window opens to the Document application where you can see the details of an attached document and see it in the File Viewer.
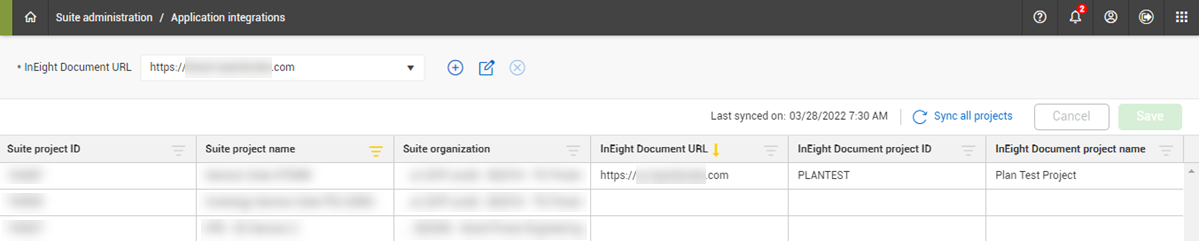
If integration with Document is not set up, you cannot click the InEight Document button. If you are a level 3 administrator, you can click the Set up InEight Document integration icon. On the Application integrations page, add your InEight Document URL if it not already added. In the table, select your InEight Document URL and project ID in the same row as your project, and then click Save.
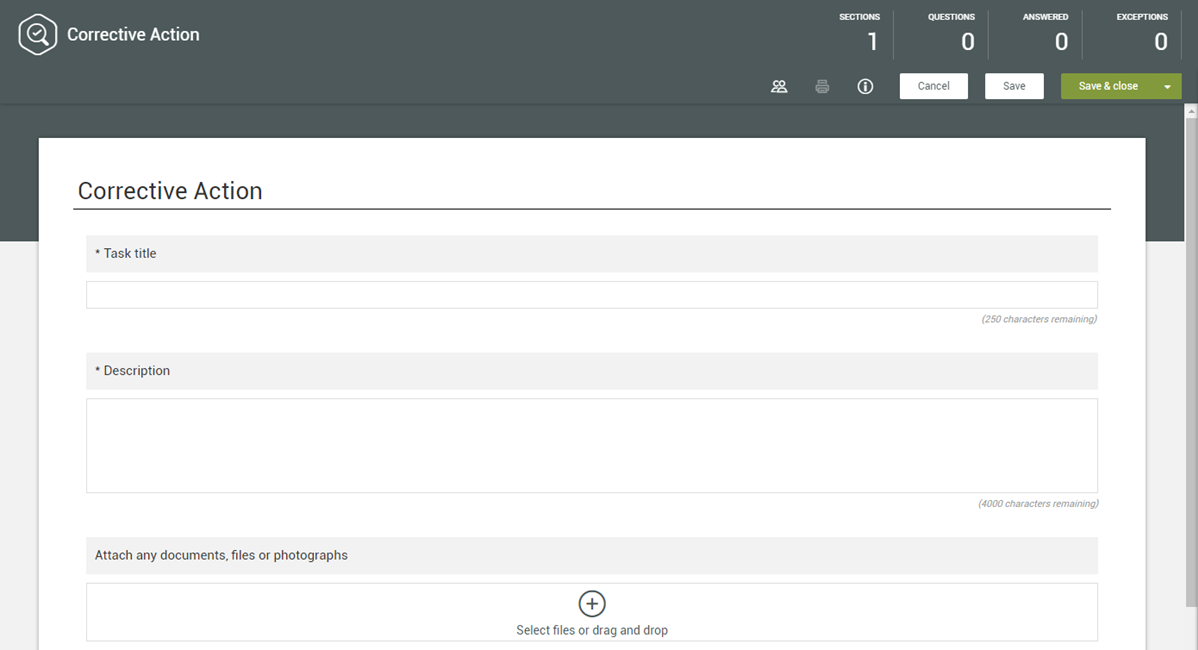
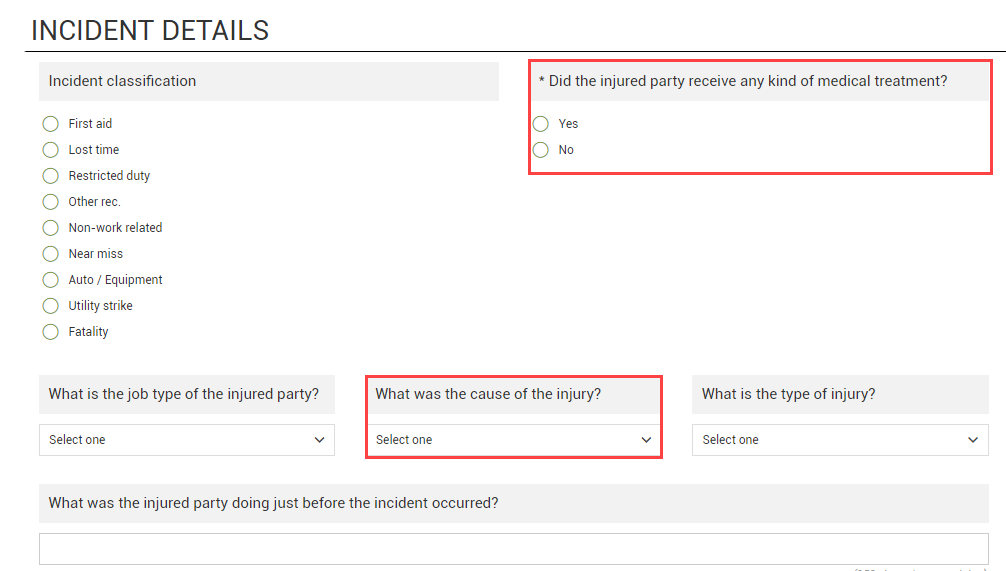
The form might require you to fill out additional details. For example, for an incident-related form you may need to determine if the incident required any first aid or if it was a near miss.
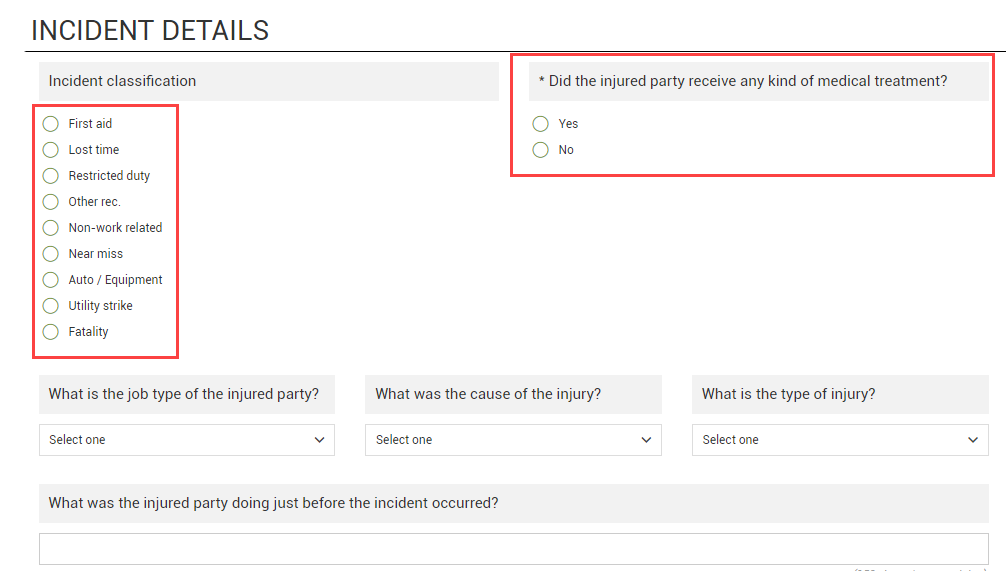
Other form questions might include determining if the injured party received any medical attention, or what caused the injury.
Tasks might also require you to fill out additional details.
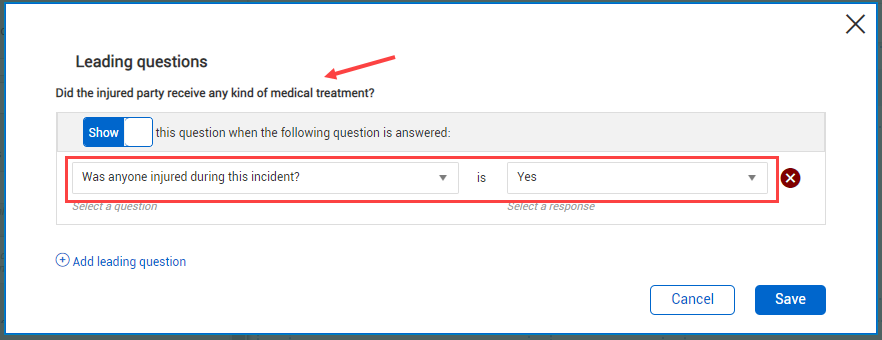
Smart forms and smart tasks generate additional questions based on how the original question was answered. For example, the below image is showing that only if the question "Was anyone injured during the accident" is answered Yes, is the following question, "Did the injured party receive any kind of medical treatment?," shown.
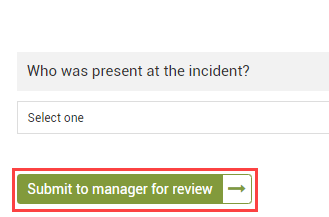
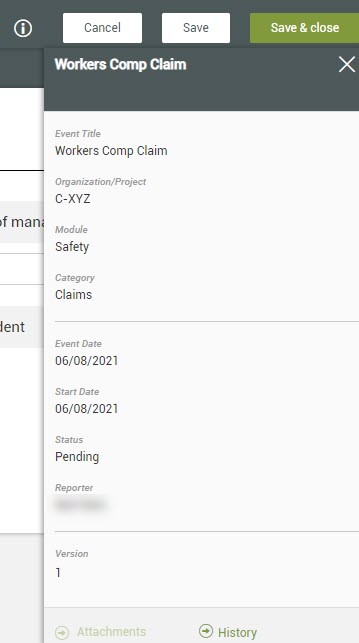
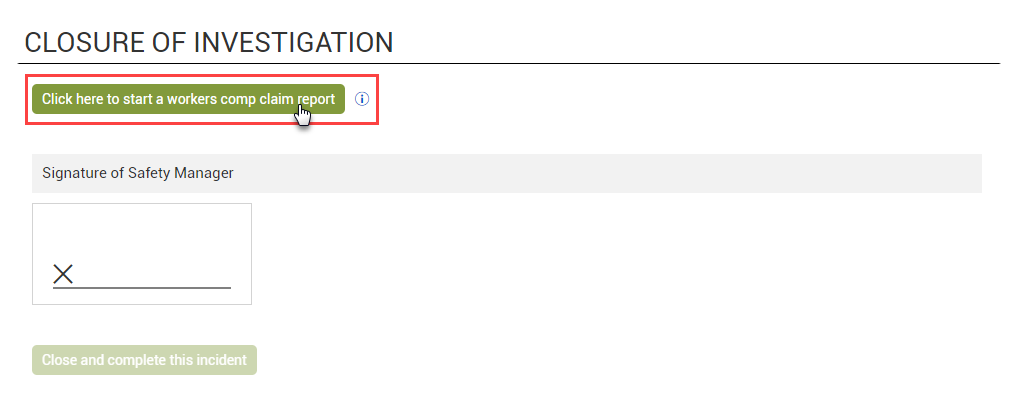
There might be a need to open a new form from within the existing form or task you are working in. For example, while working on an Incident form you might need to start a Worker's compensation claim report.

By selecting the Workmans comp claim report form button, a new form generates, and you follow the steps of that form to fill it out. After filling out the required information, you submit the form, which returns you to the original form or task you were working in.
When you click a form or task button, the status of the current form or task might change, depending on how it is set up by your administrator.
When the form you are filling out has a form flow associated with it, there are special buttons to complete each step in the flow. These form flow buttons appear similar to other form buttons but have an arrow icon next to them.
Form flow buttons that move the flow to the next step have a right arrow. Form flow buttons with a left arrow revert to a previous step.
When you click a form flow button after filling out all mandatory information, the form saves and closes.
Some form flows can be re-enabled after an event is completed, depending on the form flow's setup. Click the Re-enable form flow button in the upper-right of the page, if it is shown. When you re-enable a form flow, you can move it back to the step of your choice. All step data is saved from previously completing the form flow unless you change an answer in a way that leads to different questions based on logic.
If you re-enable a form flow, only the selected form flow is re-enabled, not all form flows associated with the template. If a re-enabled form flow leads to another form flow that is not re-enabled, you cannot see the other form flow.
You must have permission to edit completed events to re-enable a form flow.
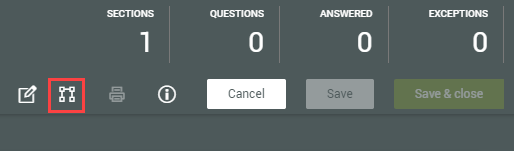
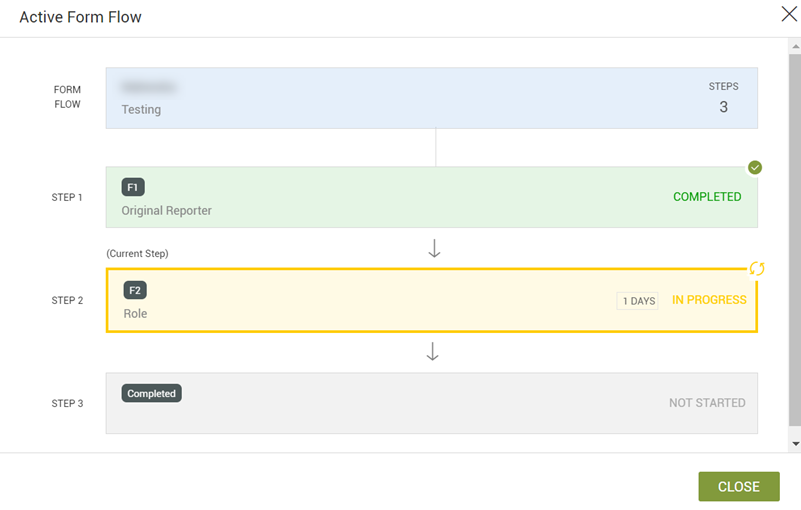
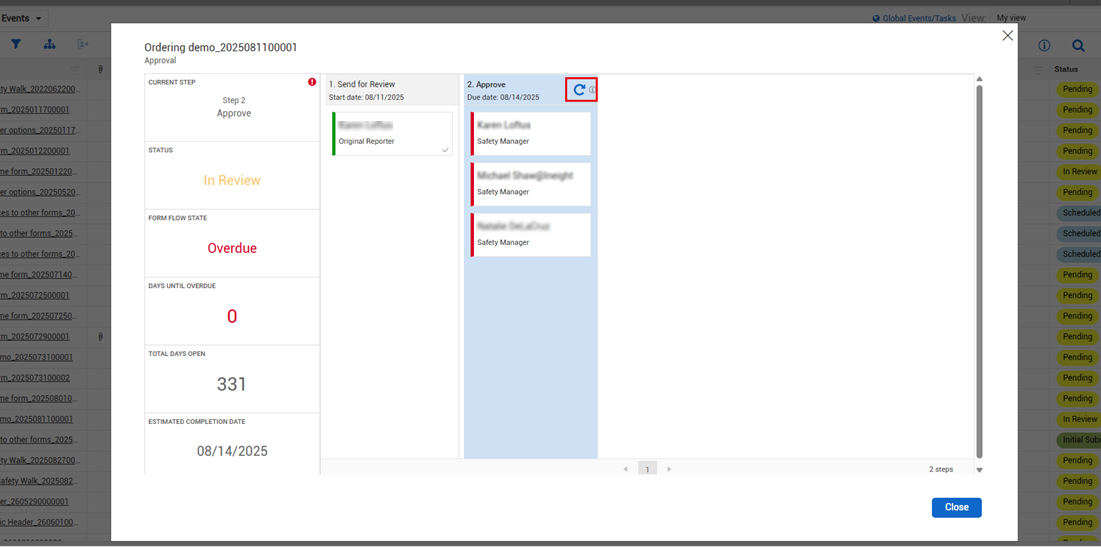
When you open an event from the Events page, and the event has a form flow that has been started, you can click the View active form flow icon at the top of the page. The Active Form Flow dialog box opens.
At the top of the dialog box is the name and description of the form flow and the number of steps. Below them, each step is shown with its status and responsible party.
If a form flow is not started, this option is disabled.
You can refresh step participants while a form is in an active step. When you refresh participants, the system recalculates the participants for the active step based on the current form flow configuration. This action applies only to the active step. If the form flow is configured to use a selected user, original reporter, or form flow initiator, you cannot refresh participants for that step. Refreshing participants also removes users who are no longer valid.
A GPS question lets you provide your location by clicking GPS or by entering your coordinates directly in the fields. You can also click Clear GPS to remove information if you need to enter a different location.
If you enter GPS coordinates automatically, you cannot manually edit the coordinates.
For more information on how to save and submit a form or task, see Complete a Form or Task.
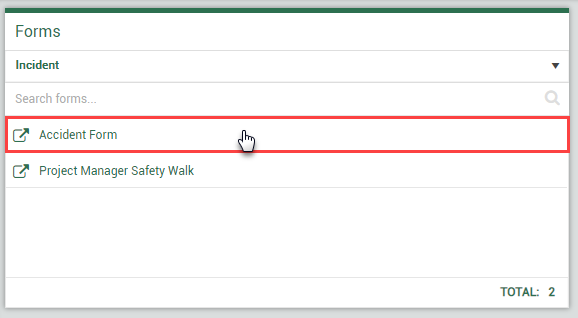
From the Compliance landing page, select a card module, Safety in this case.

From the Module landing page, select a category from the drop-down menu under Forms.
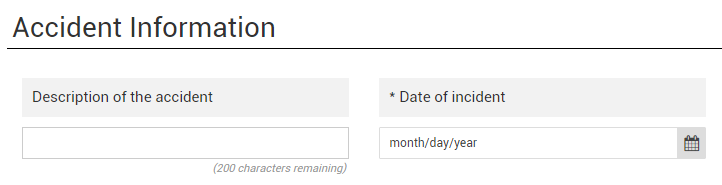
Complete all fields in the form, paying particular attention to those with an asterisk, which are mandatory fields, as they preclude you from moving ahead.

Some items require free-form data entry such as Description of the accident. Others require selecting a time or date.
Other question types may require attaching documents. Use the annotation feature to add text or drawing to an image. In this case, you could draw an arrow showing the direct location of an injury.
Some questions require selecting from radio buttons or icon type questions.
Forms most often have a button at the end to move the form along in its process. In this case, the Click here to start a workers comp claim report button initiates the form within a form feature, where the system branches to another form, in this case the Workers Comp claim form.
The process for completing a task is very similar to filling out a form.
The process is similar whether checking the status of a form or task.
The check-in and check-out options make it easy to manage who is working on an event or task. You can check out any event or task, no matter its status, to any user on the project as long as their permissions allow it. Checking out will lock the item which means only the user who checked out can make updates. When the work is finished, it can be checked back in so it's available for other crew members.
If something is left checked out by accident or you can't get back into the project, anyone with the right permissions can force check in to unlock it.
For events that include a form flow, you can also send them directly to the SQC mobile app to be completed. For more information, see Event and Task Management.
Additional Information
9977 N 90th Street, Suite 250 Scottsdale, AZ 85258 | 1-800-637-7496
© 2024 InEight, Inc. All Rights Reserved | Privacy Statement | Terms of Service | Cookie Policy | Do not sell/share my information